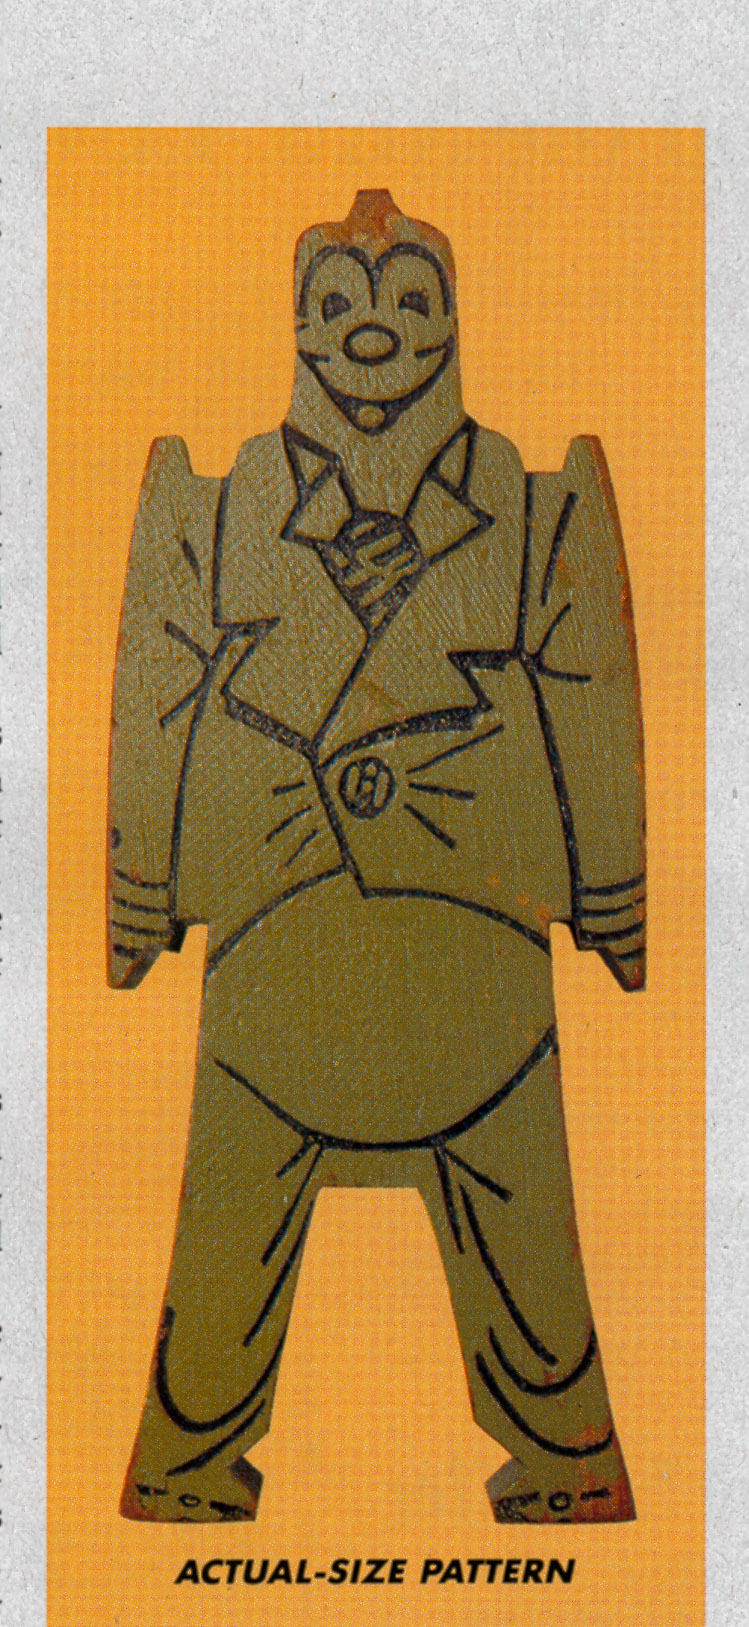
| BlLL DING ARTICLE Here is the text of the article and the actual size pattern is sent as a 540Kb attachment (BDtemp.jpeg). As a quality control side-bar, be sure to adjust the size of the feet as mentioned in the write up. Also, the actual magazine photo measures 4 7/16 inches from tip of head to a line which joins the feet. Finger-tip to finger-tip measurement is 1 25/32 inches. Note: The base board described is self evident, so I did not include another photo to keep the size of the attachments reasonable. Also obvious, using short "grabber" screws from the bottom of the base instead of dowels is way easier! Enjoy! ---------------------------------------- from Page 30 WORKBENCH, November-December 1990 ----------------------------------------------- BlLL DING Use your scroll saw to cut out set of old-time classic stackin' TOYS By Robert N. Hoffman One day my traveling friend Cort dropped into the office with a smile etched across his face. "Bobby, Bobby, Bobby," he said. "I've brought you a magazine project." In his hands were two wooden figures, one painted red, the other green. They had a smile etched across their faces, just like Cort. A clown outfit was also etched and painted in black on the figures front surfaces. The head, shoulders, hands and feet were all notched so the figures could be stacked in a number of ways. "They're called Bill Dings", Cort said, as he stacked. They belonged to Kathleen Scales, a friend of Cort's who'd bought them for her children some 40 years ago. She kindly gave them to Cort when he told her he thought they'd make a great project for Workbench. THE SEARCH FOR HlSTORY Recreating a set of Bill Dings for this article was easy. Trying to track down Bill Ding's origins was hard. In fact, my efforts to identify the manufacturer and date of manufacture were futile. I called and wrote to toy and antique collectors associations, museums and individual collectors, describing the original Bill Ding. In some instances I sent photographs. Apparently, wooden toys aren't as collectible as stuffed animals, dolls, metal trains, or almost any toy made of tin, and few people know anything about them. Although my research continues, all I've learned to date is just what Cort already knew: The name for the stacking figure is indeed Bill Ding. BUILDING BILL DINGS This is a project for the scroll saw lover. The more Bill Dings you make, the better the gift. For Bill Dings can be stacked quite high if properly balanced. I'd recommend a minimum of six to eight figures in the gift box. Start by selecting the wood. The originals are lightweight, and appear to be made of pine or fir. Oak or maple may be more durable, but it takes longer for your saw to cut through these hardwoods. The original pine Bill Dings have held up quite well for their years. The toys are 3/4 in. thick. Once you've chosen the wood, make a pattern that can be used over and over to create identical pieces. We've printed an actual-size photograph of the original, above. If you have access to a copier machine, make a photocopy, paste it onto a piece of 1/8-in. plywood or hardboard, then cut the shape on a scroll saw. Use sandpaper to smooth the perimeter to exact shape. You now have a template to recreate as many Bill Dings as you need. If you can't access a copier, trace the shape onto tracing paper, then proceed as above. VERY IMPORTANT! WATCH BILL'S FEET Use a sharp pencil to trace Bill Dings onto your wood stock, then take a good look at Bill's feet. His toes, which are on the inside of his feet below the notch, should be only about 1/16 in. high. Because of the perspective in the photograph, the toes may be too high in your traced or photocopied version. Make the adjustment to your template now. This all may seem picayune, but I can attest to the importance of skinny toes. When attempting to hang a Bill Ding by his toes, he won't fit the other Bill Ding's notches if he has fat toes. This frustrated me after I completed painting my entire set. l was stuck with fat-toed Bill Dings that didn't stack as firmly as they should. (You can see some of those fat toes in the photo, far right.) This will probably annoy a youngster as well. CUTTING AND PAINTING I cut six Bill Dings on a scroll saw using a no. 6 blade (.040 in. wide, .016 in. thick, 13 teeth per inch). You have to feed slowly with such a thin blade in 3/4-in. stock, but the blade lets you make the intricate notches without a problem. I smoothed rough spots with I50-grit sandpaper. The original figures had a small hole bored between the legs. I realized why when it came time to paint. Bore a shallow 3/32-in. hole between the figure's legs to provide a snug fit for a 10d (3-in.) nail. Now cut one paint board for each figure-the paint board is nothing more than a 1/2-in. or 3/4-in. block of wood, about 3 in. square. Hammer a nail all the way through the center of the board. Now put a Bill Ding on the nail and you're ready to paint. I used spray paint, which makes it easy to coat all the nooks and crannies. The top coat covers much better if you start with a sandable primer (I used Krylon's primer, which dries quickly). Work in a well-ventilated area, and wear an appropriate respirator and filter. Once the sanding primer is thoroughly dry, smooth any rough areas that the primer may have lifted with 400-grit sandpaper. Wipe all dust away, then spray-paint the figures one at a time. I chose neon colors because of their popularity with kids. Plasti-Kote makes three neon colors and Krylon makes several. I tried both brands-available at hardware stores and home centers-and obtained excellent results. I also tried a less expensive hardware-store brand with poor results. The nozzle clogged quickly, requiring constant cleaning, and the paint dried before it reached the wood, leaving a dust that literally blew away. When I held the can closer to the wood to get the paint there before it dried, the paint went on too thick and ran. All in all, I'd say stick with the more expensive paints. You end up with a better value by wasting less time and paint. I left the black-line details off the prototypes I built for the article, but children are sure to get greater pleasure from the toys if you paint on the happy face and clown suit, just like the original (opposite page). Use a thin artist's brush and the photograph to guide you. STACKING TECHNIQUES There are two variations to a final set of Bill Ding blocks. One involves attaching one Bill Ding to a base, as shown in the photo to the right, so children can stack a literal maze of figures without worrying about balance. Simply bore I/8-in.-dia. hole through a base board,which can be 4- x 6-in., or up to 8- x2-in. to allow for stacking a larger number of Bill Dings. Bore corresponding holes in the bottom of one Bill Ding's feet, then cut and glue 1/8-in. dia. x I-in. long dowels into the feet and board. For a more challenging game, don't include the base. It requires more patience and skill to build up a structure without a base, but 5 and 6 year olds can stack up to the challenge. CLICK HERE FOR THE PATTERN |
||